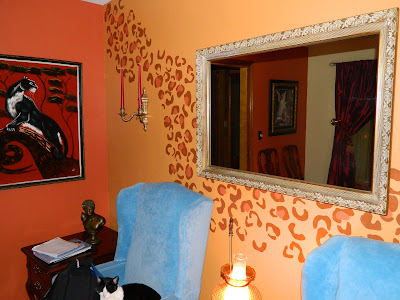
Everyone is loving my new leopard wall! My home is also my photo studio, and it is my ultimate goal to have the entire space photo-shoot ready, all day every day! Right now, every item in this room is vintage besides the drapes and curtain rods (and the kitty)! Adding a decorative finish just made it more fun and playful, not to mention I am loving the warmer colors in the paint.
This fun, 'do it yourself' project is a great way to spend your weekend. Especially with weather that is not quite warm enough to play outside but not cold enough to stay in. Open the windows and add some decorative finishes to your home. My leopard wall is a great conversation starter, and it makes me happy every time I look at it! We also painted the two smaller walls that meet it on either side, since the orangy tan color did not look good next to our old yellow/gold colored paint. Okay, I will stop blabbing and let you in on how to do this yourself!
First:
- Decide which wall you are going to paint, and assess the rest of the room. Keep in mind the other colors of the furnishings and walls. Snap some photos of the wall on your phone for a quick reference.
- Make a trip to your local hardware or paint store. Chris and I usually only go to Sherman Williams for paint, but this time we went to Lowe's. The paint colors I used are: Marigold for the background of the leopard wall, Cayenne for the spots, and Faded Clay for the accent walls as well as inside some of the spots. We also purchased Gold Dust to sprinkle in the Faded Clay paint for a little extra shimmer.
Next:
You will need to paint your wall the background color. I used Marigold. This will need to dry at least a day before you paint the spots. My wall took two coats of paint since it is Plaster of Paris and not a more modern "dry wall."
- While you have the paint out, paint one of your practice boards. This way you can practice your leopard spots later.
- Next, paint your accent walls if you need to. If your leopard wall color blends in nicely, it won't be an issue. This is why it's important to assess the room BEFORE you go to buy the paint, hehe.
 |
| I had a photo client coming the day after we painted the walls, so we had to put the room back together before we took it apart again to add the leopard! |
- Using a small roller, put the stencil down on top of your painted practice board and apply the brown paint.
 |
| Little girl always has to be in the mix of what's going on! |
 |
| The roller is blurry, but he is gently rolling the brown paint onto the practice board. We liked what we saw so the next step was the wall! |
If your practice-board test run went well, the next step is the wall. Chris and I decided to do a stripe of leopard, starting in one upper corner of the wall, and moving down to one lower corner of the wall. Afterwards, we filled in wherever we needed to avoid a choppy line type look. We wanted it to flow.
As you can see, we also used a step ladder. Chris started filling in some of the spots with the Faded Clay color as we went along. You can do it this way, or wait until you are finished with the spots, it's up to you.
 |
| We tried to keep the colored in spots in a flowing line through the middle of the leopard spots. |
After you paint the wall, you might have to make some tweaks. We didn't like how the leopard distracted from one of our candle sconces on either side of the mirror, so we painted over them with the base color.
Have fun with it! Don't forget to tell people where you got the inspiration, hehe! I'm going to keep the blogs coming as we do up the rest of our house, so please subscribe to Vintage Vamp Studios to see more ideas.
Thanks, and love you all!
For any questions on the studio or anything else, please comment here or email me at tiffanyaprilmiller@gmail.com
I will leave you with some more fun photos of the process :)
 |
| Dutchess is so pretty! I love my little girl. |
xoxo Tiffany


Awesome! Love your color combs. Great way to add a personal touch without over kill on animal print.
ReplyDeleteThank you!!!! :)
Delete