Monday, February 27, 2012

Estate Sales can be vintage jackpots, 'Electric Slide' fun, Atomic Photography package

Hey everyone,

What a wonderful weekend in Kansas City, Mo. There was so much to do, and the weather was nice. Of course, I spent my weekend working on the home front and improving things, and not at Fashion Week, le sigh. Oh well, there's always next year!

Chris and I bought our lovely home almost four years ago after I attended an estate sale here. A few of the home owner's belongings were left behind by the estate sale company, including two amazing retro refrigerators, a retro stove, and some slides. You know, those photographs you need a little contraption to look at?

Imagine our luck when last summer we attended another estate sale in the neighborhood and found a slide projector!

This winter at yet another estate sale we found a screen. Now we are in complete "Electric Slide" Heaven!

It was so neat to see photos of our house dating back to the 1960's
and 1970's! The people who lived here had exquisite taste :)
My mom was in art school when I was little, and most of the photos she took of me are in slide form. I'm so excited to devote an evening in the near future to looking at my own childhood pictures!

Another super neat thing was me winning a magazine from Atomic Photography!

I'm a big fan of their work, and it was so cool to get something fun in the mail!

I even got a personal note on some cool stationary!
It was definitely a good weekend, and I hope everyone else can say the same. This week I'm going to be super busy preparing things for my clients on Friday and Saturday.

The business is moving along quite nicely, and as always for questions on our pinup studio, Vintage Vamp Studios, just shoot me an email @ tiffanyaprilmiller@gmail.com or comment on here.

xoxo Tiffany

Sunday, February 26, 2012

Style Confession: I'm stuck in the 90's!


I'm so fascinated with the styles of the 1930's-70's. I can find something I love from every decade! The 80's, yeah not so much, lol. 


My style confession is, no matter what the trends are, and no matter how much vintage shopping and antiquing I do,  I stay a little stuck in the 90's. 


The 90's were my time. I was grunge, preppy, gangsta, and just plain cute. I went through so many trends. However, I think the simplicity of the style at the time stayed with me. Solid colors, clunky heeled shoes, Doc Marten's without zippers, tie dye. In the 90's lots of trends came back like the "mod look" of the 60's, the flared jeans of the 70's, and the big hair of the 80's. 


In the 90's I wanted to have the big gorgeous hair like Cindy Crawford, and I still do!


Um, I still want this hair!
I would rock that makeup all day long.
And the big hoop earrings. 
I wanted big arches--- glam brows.


I loved keeping it simple with pants and shoes and wearing a really cute top with accessories.


It's my goal to do another big closet haul this spring, and I hope to update my wardrobe with more 50's and 60's style clothing, like cigarette pants, sling back kitten heels, pearls, button down casual blouses, and of course lots of dresses!

My usual go-to makeup looks involve a pale
lip, pale eyeshadow and minimal blush.


Another way I want to step up my game is getting used to wearing red lips every day, and not just wear my minimal makeup looks every time I go somewhere out of comfort and laziness!


Does anyone else have any style confessions to make?


What decade are you stuck in?


Do you give your closet and makeup an over haul every season?


I will leave you with a fun tour of my 90's style, haha!


1997: Growing out bangs...so familiar, haha!
Sure wish I still had this tie-dye from It's a Beautiful Day!


Look at those "jelly" high heels!
My 8th grade dance. 1997.
I would rock this dress now (if it fit, lol)!
                                                     
Hello 1998. Nice pager!
Wait, didn't you just grow out bangs!
WTH???


1998: Pagers, dragon nails, lace tops and crosses.
Growing bangs out...again.


What's up year 1999 me?
Nice stomach, don't get used to it, lol!
Loved long hair and showing lots of skin!
Hope you all enjoyed this blog and maybe had a good laugh :)


xoxo Tiffany

Saturday, February 25, 2012

Leopard Wall: How to 'Do It Yourself!'

Hi all,

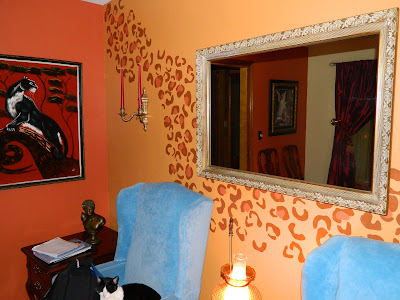
Everyone is loving my new leopard wall! My home is also my photo studio, and it is my ultimate goal to have the entire space photo-shoot ready, all day every day! Right now, every item in this room is vintage besides the drapes and curtain rods (and the kitty)! Adding a decorative finish just made it more fun and playful, not to mention I am loving the warmer colors in the paint.


This fun, 'do it yourself' project is a great way to spend your weekend. Especially with weather that is not quite warm enough to play outside but not cold enough to stay in. Open the windows and add some decorative finishes to your home. My leopard wall is a great conversation starter, and it makes me happy every time I look at it! We also painted the two smaller walls that meet it on either side, since the orangy tan color did not look good next to our old yellow/gold colored paint. Okay, I will stop blabbing and let you in on how to do this yourself!

First:

- Decide which wall you are going to paint, and assess the rest of the room. Keep in mind the other colors of the furnishings and walls. Snap some photos of the wall on your phone for a quick reference.

- Make a trip to your local hardware or paint store. Chris and I usually only go to Sherman Williams for paint, but this time we went to Lowe's. The paint colors I used are: Marigold for the background of the leopard wall, Cayenne for the spots, and Faded Clay for the accent walls as well as inside some of the spots. We also purchased Gold Dust to sprinkle in the Faded Clay paint for a little extra shimmer.


-While at Lowe's pick up some practice boards. We used these as our stencils, as well as to practice using the stencils on before we painted the wall.

Next:


You will need to paint your wall the background color. I used Marigold. This will need to dry at least a day before you paint the spots. My wall took two coats of paint since it is Plaster of Paris and not a more modern "dry wall."

- While you have the paint out, paint one of your practice boards. This way you can practice your leopard spots later.

- Next, paint your accent walls if you need to. If your leopard wall color blends in nicely, it won't be an issue. This is why it's important to assess the room BEFORE you go to buy the paint, hehe.

I had a photo client coming the day after we painted the walls, so we had to put the room back together before we took it apart again to add the leopard!
After you paint the base wall:


- You will need to make your stencil. I looked at the pattern on my favorite leopard blankets and sketched it onto one of the practice boards. My husband then put his spin on the spots and cut them out using his dangerous-looking work knife and a scratch safe surface. If you don't have these things available, you can cut them out with scissors, just be careful not to bend your stencil too much.

- Using a small roller, put the stencil down on top of your painted practice board and apply the brown paint.

Little girl always has to be in the mix of what's going on!

The roller is blurry, but he is gently rolling the brown paint onto the practice board. We liked what we saw so the next step was the wall!
Paint the wall!


If your practice-board test run went well, the next step is the wall. Chris and I decided to do a stripe of leopard, starting in one upper corner of the wall, and moving down to one lower corner of the wall. Afterwards, we filled in wherever we needed to avoid a choppy line type look. We wanted it to flow.


As you can see, we also used a step ladder. Chris started filling in some of the spots with the Faded Clay color as we went along. You can do it this way, or wait until you are finished with the spots, it's up to you.

We tried to keep the colored in spots in a flowing line through the middle of the leopard spots.
Lastly,


After you paint the wall, you might have to make some tweaks. We didn't like how the leopard distracted from one of our candle sconces on either side of the mirror, so we painted over them with the base color.


Have fun with it! Don't forget to tell people where you got the inspiration, hehe! I'm going to keep the blogs coming as we do up the rest of our house, so please subscribe to Vintage Vamp Studios to see more ideas.


Thanks, and love you all!


For any questions on the studio or anything else, please comment here or email me at tiffanyaprilmiller@gmail.com


I will leave you with some more fun photos of the process :)


Dutchess is so pretty! I love my little girl.


xoxo Tiffany

Monday, February 20, 2012

Stevie and Skippy, some of my favorite pin-up photos

Hi all,

As I move forward in the scary but fulfilling world of working for myself, sometimes it's fun to look back on some of the high notes of my short career. One of my favorite photo shoots of all time was with my sister Stevie and my cat Skippy!

Some of you might recognize this photo! It used to be the background of
this very blog!
Something about this shoot just makes me smile. I'm very hard on myself when it comes to my photos, but when I look at these I am reminded of my talent. We should be able to say good things about ourselves without feeling conceited, and yet I don't often praise my own accomplishments. I think these photos are beautiful, retro, and fun!

My cat Skippy is so pretty, but he's a rascal!
I like photos with a lot of movement, not just someone sitting all still and studio posed. However, I know I need to try other styles as well. There are many photographers out there who do the studio look, and I think they are fabulous. I'm practicing a more "cheesecake" pinup photo style, so we'll see where that heads :)

For today, I just wanted to share these fun and pretty photos with all of you. Happy Monday!

"Hey, good lookin', what you got cookin'?"
To see the complete album, please visit my Facebook like page:

http://www.facebook.com/media/set/?set=a.327542937297235.91503.194811453903718&type=3

What are your favorite Vintage Vamp Studios' photos?


Would you pose as a pin-up girl?


If you've done a shoot with us, tell us in the comments what your favorite photo was, and why.

As always, for any questions about Vintage Vamp Studios just shoot me an email @ tiffanyaprilmiller@gmail.com

xoxo Tiffany

Wednesday, February 15, 2012

'Adele' inspired makeup using Mary Kay products only

Hey all,

The makeup look I've created is great for those
into the vintage style, and those who are into
playing it safe with makeup colors! 


Everyone has been talking about Adele lately. I love her usual look of nude lips with a dramatic eye. Very 60's Streisand (I think). Just gorgeous!

So pretty!
There are some nude and peachy colors in the Mary Kay collection that really stand out, and good nudes are not always easy to find (haha). I also had fun styling the model's hair with no product, only bobby pins and a ponytail holder. She was going out later that night, and didn't want her hair teased or hairsprayed! Still, we came out with a fun hairstyle, and when she took it out her hair still looked great down. So without further ado, here is the look, product list, and photos! :)

My lovely model.

Mary Kay products I used for this 'Adele' inspired look:

FACE
Foundation primer *optional*
Cream Concealer Ivory 2
Medium Coverage Foundation Ivory 1
Mineral Powder Foundation Ivory 1

EYES
Blonde eye brow pencil
Cream Eye shadow in Pale Blush
Cinnabar Mineral Eye Color
Black eyeliner pencil
Black Ultimate Mascara

CHEEKS
Sunny Spice Mineral Cheek Color

LIPS
Neutral Lip Liner
Melon Sorbet Lip Gloss

Application:

Face: Begin with a freshly cleansed and moisturized face. I applied foundation primer. This step is optional, but I recommend it if you have any facial scars or wrinkles. The primer will settle in those crevices in your skin, and prevent the liquid foundation from settling in them. After primer I applied the concealer to under-eye area, and liquid foundation to face. I used a sponge, but fingers work just fine. I then dusted the mineral powder  all over face (helps set the liquid foundation) using a cotton ball. Cotton balls are great for makeup application, especially if you are trying to keep the look minimal.

Eyes: First comes eye brows. They are very important to these retro style looks. I watched a great Youtube tutorial by Pinuplovely87 on applying eye brow makeup. Her suggestion was to comb the brows DOWN, color in the arch, comb them back UP, and then color in gaps. I've found this method to work great with clients and myself. Pinuplovely87 suggests using brow powder, but I prefer a pencil. Just use small strokes and try not to press too hard. Good eye brow shaping is an art and you will get better with every application.

Moving on :)

Apply cream eye color to eye area from lid to brow bone. Use a nice thick coat. When it has dried (a few seconds) apply Cinnabar eye shadow to crease only. Follow the crease of your eye and go slightly above it, while still leaving space under your eye brow. Look at the pictures if you need to for an example of what I'm talking about :) Don't blend too much, we want to keep a little drama in the eye look.


Line upper lid only with a black eye liner pencil staying as close to lash line as possible and filling in any gaps. Go slightly out on the side with cat eye, but not too far. This isn't gel or liquid liner, so we're not doing a huge cat eye (I know Adele does sometimes, but this is a more casual, quick, and easy look).

Apply two thick coats of black mascara to upper lashes, one good coat to lower lashes as well (but no eyeliner down there!)

Cheeks: Apply blush to upper cheekbones. Blend slightly, but keep it dramatic without going overboard. Blush is good to apply a little at a time, but this color is almost impossible to mess up with! I used a cotton ball to apply the model's.

Lips: Line lips with neutral lip liner (fill in lips with pencil for extra long lasting color). Fill in lips with gloss.

That's it! Pretty simple!

You can substitute your brand or what makeup you have for Mary Kay and still accomplish this look. However, I am a big fan of all these colors, and a huge advocate of Mary Kay products! :)

For Summer's hair I simply separated a "bang" section, and took the top part of her hair at the crown and twisted it into a bump. Pin with bobby pins. This is a great way to fake a bump without teasing! :) I pinned the bang section to the side, and then pulled all the hair into a side braid. Very pretty.

After the shoot she kept the makeup but switched hairstyles!
Heck yes to super long hair! So on trend, but I guess it's the trend we should have been thinking
about three years ago haha. #growingtime

Please comment on this look and let me know what you think.

What celebrity look would you like to challenge me to recreate?

What trend are you loving right now?

For more information on Vintage Vamp Studios, please visit my Facebook page

http://www.facebook.com/vintagevampstudios

Or just shoot me an email :)

tiffanyaprilmiller@gmail.com

Love you all!

xoxo

Tiff